The beauty of working on a small project like this is how effective it is at refreshing your knowledge, helping you understand what it takes to build a reliable product, and giving you intuition or a high-level overview of new concepts.
Through this project, I’ve gained insight into how some similar commercial products works, and I’ve come to truly appreciate the effort it takes to build and ship them.
This note contains what I’ve learned about networking (including some refreshers), the Linux filesystem, the basics of Firecracker, and more.
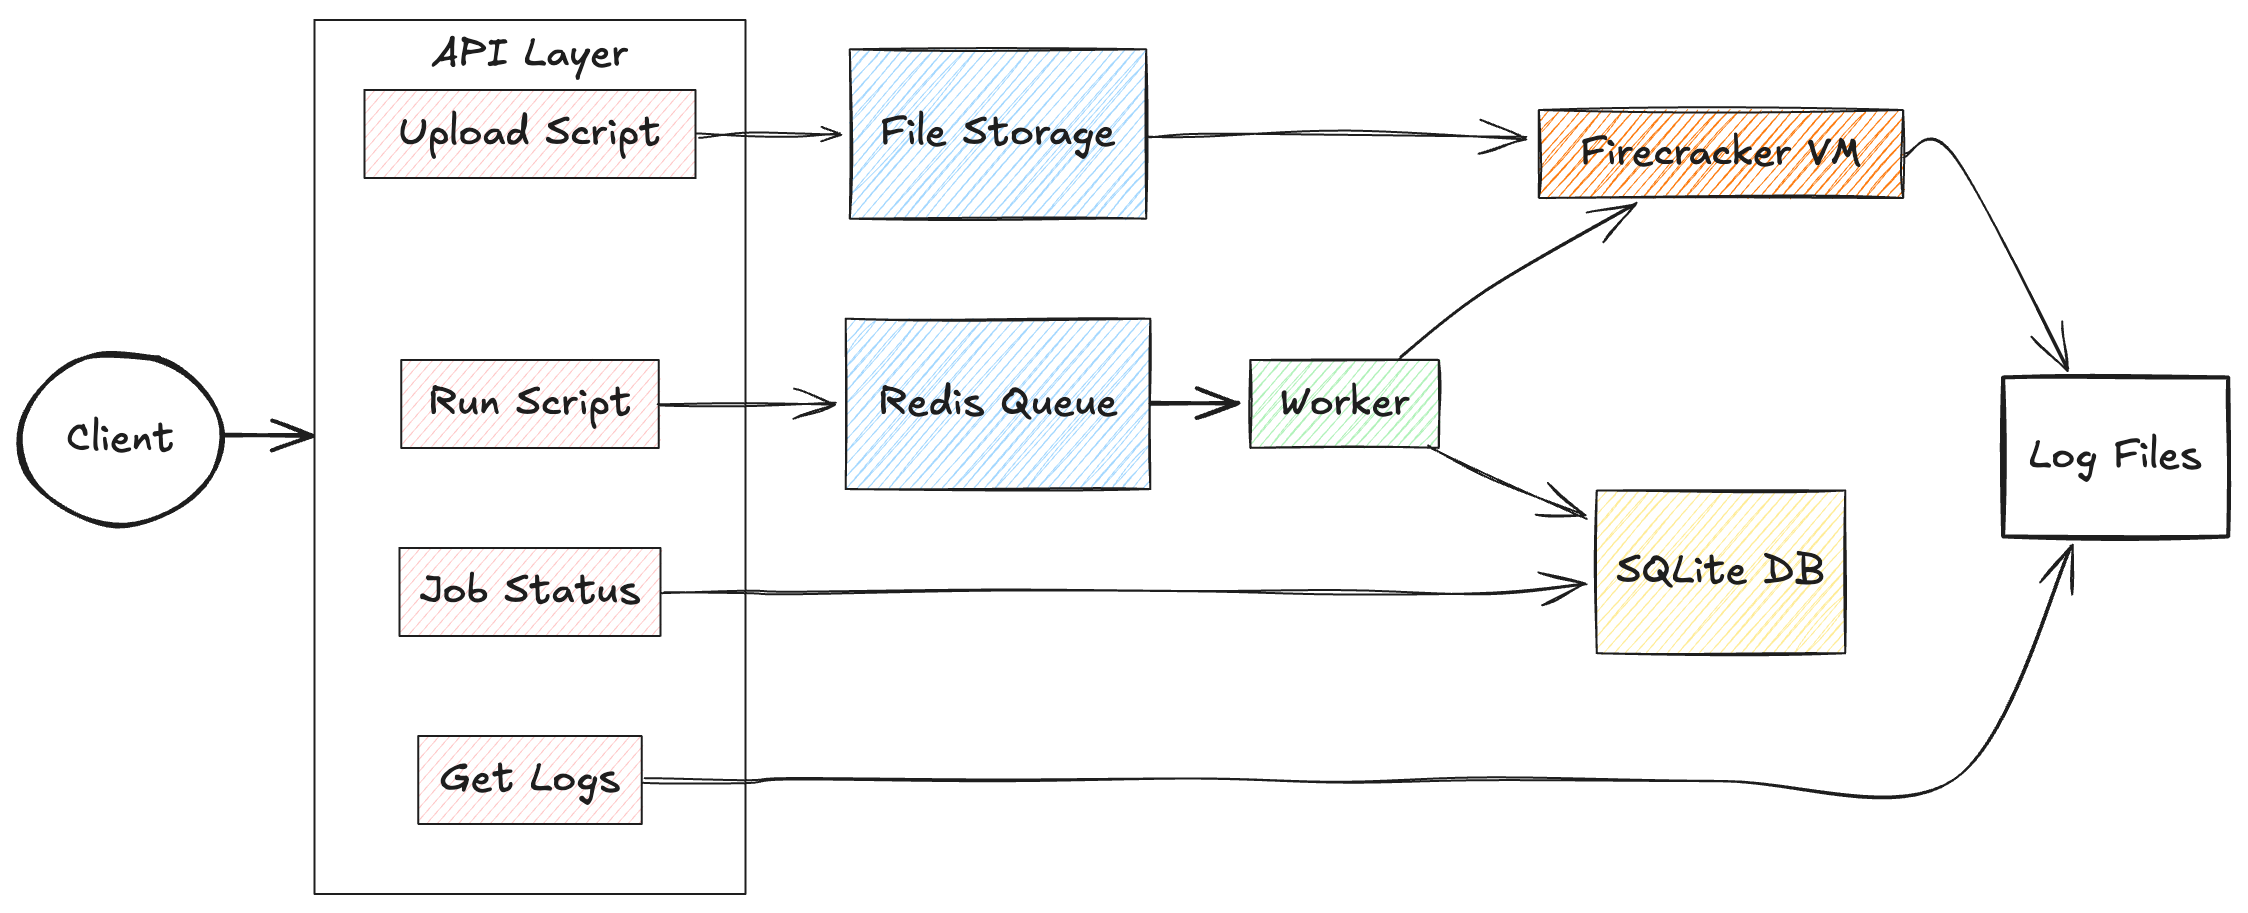
Basically, we have api to upload script and python code, and then api to run the uploaded code, another api to fetch job status and logs. Whenever file is uploaded it is stored in a filestorage, and when the user initiate the runscript api, the workers picks up the file via it script ID, create a job, initializes and run firecracker by mounting the uploaded file into the vm’s linux filesystem.We use an SQLite database to store the job status.
If we zoom into the system here is what we have:

Linux vm image and filesystem
In the image above we have the Firecracker VM runner pointing to VM Images and that points to Linux kernel and Root filesystem. To run the VM, we need to decide on the type of linux kernel and filesystem we want.
The project includes a script build_rootfs.sh, used to generate this two entities. Firs, we fetched a compactible linux kernel prebuilt for firecracker
set -e

WORK_DIR=$(mktemp -d)
wget https://s3.amazonaws.com/spec.ccfc.min/img/quickstart_guide/x86_64/kernels/vmlinux.bin -O $WORK_DIR/vmlinux
chmod +x $WORK_DIR/vmlinux
We have the kernel now. The next step is to create a minimal filesystem structure and populate it with essential utilities. We install Busybox; a single binary that provides hundreds of standard Unix tools through symlinks:
mkdir -p rootfs/{bin,sbin,etc,proc,sys,dev,tmp,usr/local/lib,usr/local/bin}
wget https://busybox.net/downloads/binaries/1.35.0-x86_64-linux-musl/busybox -O rootfs/bin/busybox
chmod +x rootfs/bin/busybox

# Create symlinks for all BusyBox utilities
for applet in $(./bin/busybox --list); do
    ln -sf /bin/busybox bin/$applet 2>/dev/null || true
done
For pyhton support and user code execution, we install a static python build and create an init script that handles mounting and running user code:
I spent considerable time getting Python to work properly. One of the main challenges was finding a small yet fully functional standalone Python installation, as many of the options I tested had limited feature support. This experience helped me understand why many edge worker environments (like Cloudflare Pages with Node.js) only support a subset of features from the installed programming languages.
# Python installation (shortened)
wget https://github.com/indygreg/python-build-standalone/releases/download/20240107/cpython-3.11.7+20240107-x86_64-unknown-linux-musl-install_only.tar.gz -O python.tar.gz
cp $PYTHON_BIN rootfs/bin/python3.11

# Init script - the VM's first process
cat > rootfs/init <<EOF
#!/bin/sh
# Mount essential filesystems
mount -t proc proc /proc
mount -t sysfs sysfs /sys

# Mount user script drive (/dev/vdb) and run scripts
mkdir -p /mnt/script
mount /dev/vdb /mnt/script

# Execute all scripts found in the mounted directory
for script in /mnt/script/*; do
    if [ -f "\$script" ]; then
        case "\${script##*.}" in
            py) python3 "\$script" ;;
            sh|bash) sh "\$script" ;;
        esac
    fi
done

# Shutdown when done
poweroff -f
EOF
chmod +x rootfs/init
The
/dev/vdbdevice is a key concept I learned; it’s the second virtual disk that gets attached to the VM at runtime. In Linux, disk devices follow a naming pattern: /dev/vd[a-z]. The first disk (/dev/vda) contains our root filesystem, while/dev/vdbcontains the user code to execute. By mounting this second drive at runtime, we maintain a clean separation between the VM system and the code it runs.
Finally we package everything into an ext4 filesystem
dd if=/dev/zero of=$WORK_DIR/rootfs.ext4 bs=1M count=600
mkfs.ext4 -F $WORK_DIR/rootfs.ext4

# Mount and copy files
mkdir -p /tmp/rootfs_mount
sudo mount -o loop $WORK_DIR/rootfs.ext4 /tmp/rootfs_mount
sudo cp -a $WORK_DIR/rootfs/* /tmp/rootfs_mount/
sudo umount /tmp/rootfs_mount

sudo cp $WORK_DIR/vmlinux $OUTPUT_DIR/
sudo cp $WORK_DIR/rootfs.ext4 $OUTPUT_DIR/
This taught me how Linux filesystem images are created:
ddcreates a 600MB empty file filled with zerosmkfs.ext4formats it as an ext4 filesystemmount -o looplets us mount a file as if it were a physical device and make its contents accessible through the/tmp/rootfs_mountdirectory- We copy our prepared files into it
- Finally umount detaches the filesystem
At the end of running the build_rootfs.sh, we should have two files: vmlinux and rootfs.ext4. These will be passed into Firecracker.
fcCfg := firecracker.Config{
		SocketPath:      socketPath,
		KernelImagePath: "pwd/vmlinux",
		Drives:          []models.Drive{
            {
                DriveID:      firecracker.String("rootfs"),
                PathOnHost:   firecracker.String("pwd/rootfs.ext4"),
                IsRootDevice: firecracker.Bool(true),
                IsReadOnly:   firecracker.Bool(false),
            },
            {
                DriveID:      firecracker.String("script"),
                PathOnHost:   firecracker.String(scriptDrive),
                IsRootDevice: firecracker.Bool(false),
                IsReadOnly:   firecracker.Bool(true),
            }
        },
		MachineCfg: models.MachineConfiguration{
			VcpuCount:  firecracker.Int64(1),
			MemSizeMib: firecracker.Int64(128),
		},
		JailerCfg:         nil,
		NetworkInterfaces: networkInterfaces,
		LogFifo:           fifoPath,
		MetricsFifo:       metricsPath,
		LogLevel:          "Debug",
		KernelArgs:        "console=ttyS0 reboot=k panic=1 pci=off init=/init",
	}
ScriptDrive and KernelArgs
In the fcCfg confif we specify a field called Drives. The first drive in the list represent /dev/vda which is the root filesystem we created in build_rootfs.sh. The second drive is the /dev/vdb. Recall we previously mentioned /dev/vdb, and used this command mount /dev/vdb /mnt/script; this makes the content of this device available via /mnt/script.
Whenever we run the uploaded script, we fetch it from storage,format it to generate scriptdrive which is then passed to fcCfg config.
scriptDrive := filepath.Join(os.TempDir(), fmt.Sprintf("script-%s.ext4", vmID))
err = createExt4ImageWithScript(scriptPath, scriptDrive)
What the code does is similar to what w’ve discussed before:
-
Create an empty disk file: Uses truncate to create a 10MB empty file with a unique name like
script-{UUID}.ext4 -
Format the file as ext4: Runs
mkfs.ext4to turn this empty file into a proper Linux filesystem -
Mount the filesystem: Creates a temporary mount point and uses the
mount -o loopcommand to make the filesystem accessible -
Copy the user script: Takes the original script file and places it at the root of this newly mounted filesystem
-
Prepare for VM use: Unmounts the filesystem and attaches it to the VM as a second virtual disk
(/dev/vdb)
When the VM boots, its init script will mount this second disk at /mnt/script, making the user’s script available for execution.
For the kernelArgs: "console=ttyS0 reboot=k panic=1 pci=off init=/init"; init=/init specify the first program to run which contains the init file we created in build_rootfs.sh, it also responsible for running our uploaded code. And i so learned about PCI bus scanning and firecracker does not use it, hence diabled pci=off
Networking
This network part is a refresher to this article on vpn that i wrote last year.
The firecracker networkInterfaces configuration requires a MAC address and a TAP interface name, so we need to create both:
networkInterfaces = append(networkInterfaces, firecracker.NetworkInterface{
    StaticConfiguration: &firecracker.StaticNetworkConfiguration{
        MacAddress:  guestMac,
        HostDevName: tapName,
    },
})
For the guestMac, we have a function that generates a unicast and locally administered MAC address. It first creates a random 6-byte buffer, then ensures:
-
Bit 0 = 0 (indicating unicast)
-
Bit 1 = 1 (indicating locally administered)
buf[0] = (buf[0] | 2) & 0xfe
For the tapName, we created a tap interface , a bridge and how it can communicate to the internet throught the host default network interface:
- Creates a virtual TAP device (e.g., fc-tap-abc123) using the Linux ip command
- Sets up a bridge (fcbr0) with private IP address 192.168.100.1
- Configures
NATandIPforwarding for internet access
Once this is done, we also update the KernelArgs we add the following to configure the network before the init system :
#ip=<client-ip>:<server-ip>:<gateway-ip>:<netmask>:<hostname>:<device>:<autoconf>
kernelArgs += " ip=192.168.100.2::192.168.100.1:255.255.255.0::eth0:off"
Finally, when we talked about the /init file created in build_rootfs.sh i skipped this part:
ip link set eth0 up
echo "nameserver 8.8.8.8" > /etc/resolv.conf
echo "nameserver 1.1.1.1" >> /etc/resolv.conf
- The VM has network connectivity through the TAP device and bridge
- It has an IP address (192.168.100.2) and gateway (192.168.100.1)
- But without DNS, it could only communicate using raw IP addresses
By configuring Google’s DNS (8.8.8.8) and Cloudflare’s DNS (1.1.1.1), we give the VM the ability to resolve domain names. We use two different providers for redundancy; if one DNS service is unavailable, the system will try the other.
LLM
I had the idea to build this with only a little knowledge of Firecracker or the Linux filesystem. But with the help of an LLM, I was able to gather the right learning resources and write better prompts. The LLM helped me find a list of standalone Python installers to use, and even when I couldn’t remember certain commands for network setup, a single prompt brought everything back.
I believe that with a better understanding of what you’re building, you can really vibecode at a deeper level. My recommendation is always to first understand the requirements, read more about the domain, and let that shape how you write your prompts.
Conclusion
This started as a simple project for learning purposes, but it could actually grow into something much bigger. You could add user authentication and authorization, use eBPF to monitor incoming and outgoing traffic, integrate WireGuard to access private networks, add APIs to adjust CPU and memory allocation, support more programming languages, and handle deployment.
I was able to gain a foundational understanding of the Linux filesystem and KVMs. I’m still exploring areas like VirtIO, PCI, and related concepts—and I might write more about these in future articles.
Resources
- link to code: https://github.com/steveoni/microvm
- Firecracker docs https://github.com/firecracker-microvm/firecracker/tree/main/docs
- especially the getting started https://github.com/firecracker-microvm/firecracker/blob/main/docs/getting-started.md